LED light strips are energy-efficient, can be cut, and are easy to install, while also supporting custom sizes. However, many users may encounter a common problem during installation—the LED light strip doesn’t working after cutting. So what exactly causes this phenomenon? In this article, we will analyze the reasons for this problem in detail and provide relevant solutions to help you easily solve this issue. More details, pls read How do LED Strip Lights Work?
Why can LED Strip Lights Only Be Cut at Specific Locations?
LED strips cannot be arbitrarily cut; the circuit board for each LED is pre-designed. If you look closely at the light strip, you’ll see a pair of copper contact points marked with a scissor icon at short intervals. These are the designated cutting points; you can only cut at these locations.
The underlying principle is parallel circuitry. An LED light strip is composed of multiple independent light-emitting units connected in series and parallel. Each cutting point represents the end of a complete circuit unit and the beginning of the next. Within each unit, the LEDs and resistors are connected in series, while the units themselves are connected in parallel.
When you cut at the correct point, you only separate a complete parallel unit from the overall circuit without affecting the current path within that unit. This is why the remaining part and the cut-off part can function independently.
Conversely, if you cut in the wrong place, you will disrupt the circuitry within that unit, causing that unit and all subsequent units to fail to light up.
Common Reasons Why LED Strip Don’t Working After Cutting
Standard LED strips are 5 meters/reel, so cutting is necessary during installation. Of course, some are custom-made. When cutting, pay close attention to the cut location. Here are five major culprits that cause the LED strip to not working after being cutting.
Incorrect Cutting Position
This is the most common reason why LED strips won’t light up after being cut. As mentioned earlier, the cut must be made precisely in the middle of the copper pads marked with scissors.
If you cut anywhere else between the two pads, it’s equivalent to severing the delicate FPC (Flexible Printed Circuit) wiring inside the strip. Current cannot flow, and naturally, it won’t light up.
Reversed Positive and Negative Terminals
LED stands for Light Emitting Diode, and its core characteristic is unidirectional conductivity. Current can only flow in from the positive (+) terminal and out from the negative (-) terminal.
When cutting an LED strip, it needs to be re-lit. If you reverse the positive and negative terminals when reconnecting the cut strip, the strip will absolutely not light up.
Damaged or cold solder joints
If you choose to connect the LED strip using soldering, a certain level of soldering skill is required. Cold solder joints (solder failing to make good contact with the pads and wires) or short circuits (excessive solder causing the positive and negative terminals to connect) will both cause the LED strip to fail to light up.
Furthermore, using an overheated soldering iron or holding it for too long can damage the fragile copper pads, causing them to detach from the flexible substrate.
LED Strip Voltage Mismatch
LED strips operate at different voltages, commonly 12V and 24V. These must never be mixed. If you connect a 12V strip to a 24V power supply, the LEDs will burn out instantly due to excessive voltage.
Conversely, connecting a 24V strip to a 12V power supply will cause the strip to fail to start or have extremely low brightness.
LED Strip Damage or Circuit Board Breakage
Sometimes the problem isn’t with your handling. The LED strip itself may have suffered physical damage during shipping or installation, such as tiny cracks in the FPC circuit board that are difficult to see with the naked eye.
It’s also possible that excessive force was used during installation or cutting. This can damage adjacent solder pads and cause the LED strip to fail to light up.
How to Properly Cut LED Strips?
Mastering the correct cutting method is key to ensuring the proper functioning of LED strips. Cutting LED strips is generally necessary.
Step 1: Power Off Operation
Before cutting the LED strip, always disconnect the power supply. Ensure the strip is completely powered off. Cutting while the circuit is live is not only dangerous but can also damage the strip due to a momentary short circuit.
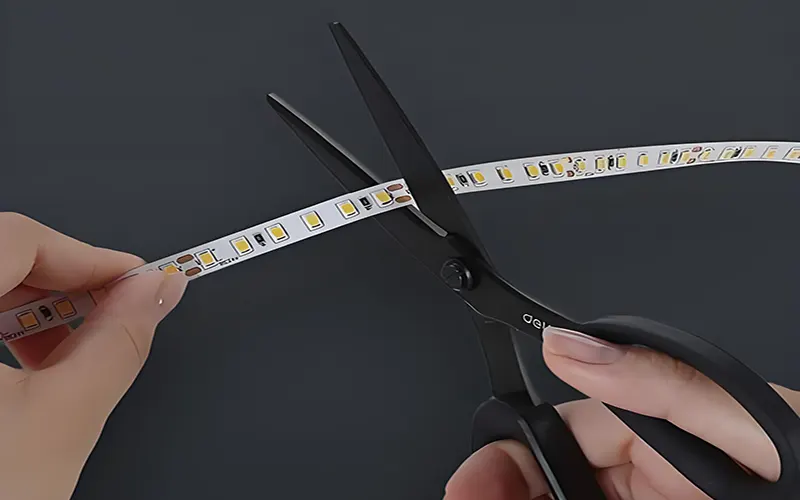
Step 2: Precise Positioning
Lay the LED strip flat on the work surface and carefully locate the cutting marks using sufficient light. These marks are usually indicated by a scissor icon, dotted lines, or the word “CUT HERE,” and are fixed in the center between the two copper foil pads.
Step 3: Tool Selection
We need to use sharp scissors or a utility knife for cutting. Dull tools will compress the circuit board, potentially causing deformation or even breakage of the internal copper foil. Professional users are recommended to use electronic component-specific scissors for a cleaner cut.
Step 4: Vertical Cutting
Maintain the blade perpendicular to the surface of the light strip and make a single, swift cut; avoid repeated or angled cutting. The cut edge should be neat and smooth, free of burrs or torn plastic debris.
Step 5: Inspect the Cut
Immediately after cutting, inspect both ends of the cut to ensure that the copper foil pads are fully exposed. The surface of the pads should be smooth and flat, free from any covering plastic residue; this is crucial for subsequent connections.
Step 6: Protective Treatment
If the cut end of the LED strip is not to be used immediately, it is recommended to wrap the solder pads with electrical tape to prevent the ingress of dust and moisture, or to avoid accidental short circuits.
Summary
Properly cutting LED light strip is essential to ensure they working correctly thereafter. We trust that you now have a comprehensive understanding of LED strip operation, cutting techniques, and troubleshooting. You have progressed from understanding why they can be cut to knowing how to avoid the pitfalls that cause them not to light up. If you are in need of LED light strips or neon flex, please do not hesitate to contact us.
FAQs
It is quite easy to distinguish between them; you can check the information printed on the packaging or look for the labels “DC12V” or “DC24V” clearly printed directly on the LED strip’s PCB board.
Yes, it can. Provided that you cut at the correct location and can supply a compatible power source—either through soldering or using a miniature connector—any segment of the light strip that is longer than a single cutting unit can function independently.
No, LED light strips can only be cut at specific locations. You must follow the designated cutting lines marked on the strip. Improper cutting may prevent the light strip from functioning correctly or result in circuit damage. Each light strip features pre-designed cutting points.
There are several possible reasons. The reasons why an LED strip might fail to light up after being cut include: cutting at the wrong location, reversing the positive and negative polarity, damaged solder joints, a voltage mismatch between the strip and the power supply, or damage to the circuit board.
If the cut is made at the correct location and the circuitry remains undamaged, the brightness and color performance of the LED strip will not be affected. Generally speaking, cutting the strip will not change its lighting effect or colour output.