With the widespread adoption of smart lighting, the DMX512 protocol has become one of the standards for controlling LED strip lights. It is frequently seen in stage lighting and architectural lighting. DMX512 LED strip lights are widely used due to their high efficiency and stability. In this article, we will delve into the basics of DMX512 LED strip light chip, including selection guidelines, installation methods, and their importance in large-scale projects.
What is a DMX512 LED Strip Light Chip?
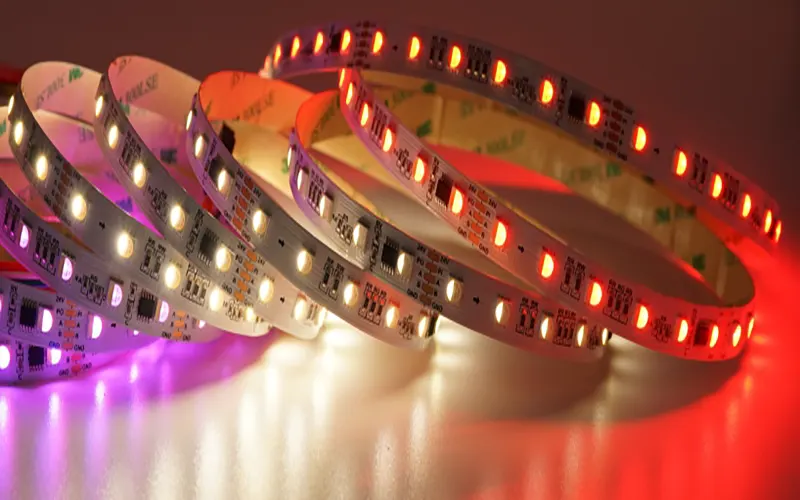
Simply put, a DMX512 LED strip chip is a miniature integrated circuit that decodes the DMX512 control signal and converts it into lighting output commands. Manufacturers can use it either as a standalone IC or integrate it directly with RGB or RGBW LED chips, allowing them to individually address and control each LED segment or pixel. More details, pls read What is the Difference Between DMX 512 and SPI LED Strip?
To understand LED chips, you must first understand DMX512. DMX512 is a standard digital communication protocol widely used in professional lighting control.
It’s like the “nervous system” of the lighting world, sending commands to up to 512 “channels” via a single signal line. Each channel controls an attribute, such as the red, green, or blue brightness of an LED.
The DMX512 chip is the “end-point commander” in this system. It’s soldered onto an LED strip, with each chip controlling one or more LEDs.
When the controller sends the DMX512 data stream along the strip, each chip listens to the signal and retrieves its own set of instructions based on a pre-set address (e.g., chip “address 1” controls the first three channels, corresponding to R, G, and B brightness). It then precisely drives the LEDs to produce the specified color and lighting output.
It is this “one chip, one address” mechanism that enables independent pixel-level control of each LED.
How to Choose the Right Driver Chip for DMX512 LED Strip Light?
I believe choosing the right DMX512 LED strip light chip is crucial for project stability, brightness, and cost.
Key Indicators: Chip drive current (determines LED brightness), grayscale level (determines color smoothness), refresh rate (affects the smoothness of dynamic effects), and cascade length.
Constant Current vs. Constant Voltage:
- Constant Voltage (e.g., 12V/24V): Suitable for general applications, simple wiring, but voltage drop may occur over long distances.
- Constant Current (often used in high-power LED strips): Constant current LED strips provide a more stable current, ensuring consistent brightness across all LEDs, but wiring and power supply design are more complex.
Comparison of UCS512C4, SM18512PS, and TM512AC
The table below provides a detailed comparison of the main features and applicable scenarios of three common DMX512 LED driver chips.
| Feature Comparison | UCS512C4 (Constant Voltage) | SM18512PS (Constant Voltage/Constant Current Optional) | TM512AC (Constant Voltage/Constant Current Optional) |
| Main Functions | DMX512 Decoding and Driver | DMX512 Decoding and Driver | DMX512 Decoding and Driver |
| Operating Type | Constant voltage drive (e.g., 12V/24V) | Constant voltage or external constant current | Constant voltage or external constant current |
| Number of Channels | 4 Channels (R, G, B, W/Luminosity) | 3 Channels (R, G, B) or 4 Channels | 3 Channels (R, G, B) or 4 Channels |
| Core Advantages | High-precision grayscale control, 4-channel design, and delicate color reproduction. | Widely applicable in the market, mature and stable, cost-effective, and with balanced driving capabilities. | Supports breakpoint resume functionality. |
| Reliability characteristics | Good | Good | Very high (failure of a previous chip does not affect the operation of subsequent chips) |
| Cascading capability | Excellent | Excellent | Excellent |
| Applicable Scenarios | Mid-to-high-end architectural and artistic lighting projects with stringent requirements for color quality and brightness. | Large-scale outdoor landscape and bridge illumination projects requiring a balance between cost-effectiveness and stability. | Projects demanding the utmost reliability in system operation (e.g., super-high-rise buildings, long-distance linear lighting strips). |
| Integration Level | High integration; simplifies circuit design | Moderate | Moderate |
Troubleshooting and Maintenance of Common DMX512 LED Strips
Even high-quality DMX512 LED strip systems may encounter various problems during long-term use. Mastering troubleshooting methods for common faults allows for quick location and resolution of issues, ensuring stable system operation.
Signal Transmission Faults
If some LED beads fail to light up or display abnormal colors, the first step is to verify that the DMX signal cables have a secure connection. The connectors, in particular, are prone to poor contact caused by oxidation.
Use a multimeter to measure the differential signal voltage; under normal conditions, it should be approximately ±2V. If the signal attenuation is severe, a DMX signal amplifier may be required—especially when the total bus length exceeds 200 meters.
Address Conflicts
When installers inadvertently assign the same DMX starting address to multiple LED strips, they create control confusion. To avoid this, they should create a detailed address allocation chart before installation and label each strip segment with its specific address range.
Many professional DMX512 controllers now feature an address scanning function, which can automatically detect the address distribution of devices connected to the bus.
Power Supply Issues
Voltage drop is a particularly prominent issue in long-distance LED strip installations. If the LED beads at the far end exhibit color shifting or insufficient brightness, it is highly likely caused by excessive voltage drop.
We recommend using a multi-point power supply strategy; typically, you should establish a power injection point every 5 to 10 meters to ensure that each strip segment operates within its rated voltage range.
Poor Heat Dissipation
Poor heat dissipation can trigger the chip’s overheat protection mechanism or lead to a shortened service life. Particularly when operating in high-brightness, continuous-duty modes, it is crucial to ensure that the light strips are provided with adequate heat dissipation conditions.
During installation, you should allow sufficient ventilation space. Where necessary, you can add aluminum heat sinks or active cooling fans. You should also monitor system temperatures regularly to prevent prolonged operation under high-temperature conditions.
Routine Maintenance
We recommend conducting a quarterly system inspection, checking for loose wiring terminals, dust accumulation on the light strips, and stable power supply voltage.
For outdoor installed systems, special attention should be paid to the integrity of the waterproof seal. Establishing equipment records to document the content of each maintenance and any problems found will help identify potential problems early.
DMX512 LED Strip Lights Installation Steps
The installation of DMX512 LED strips can be somewhat complex. Adhering to the correct installation steps is crucial for ensuring the stable operation of the system:
Planning and Addressing: Plan the layout of the light strips and determine the starting DMX address for each segment. This is the most critical step.
Power Supply Deployment: Calculate the total power consumption and install switching power supplies with sufficient capacity at appropriate locations. For long runs of light strips, multi-point power injection is recommended to prevent voltage drop at the far end.
System Connection: Connect the components in the following sequence: DMX Controller -> DMX Signal Amplifier (if required) -> First DMX Light Strip -> Next DMX Light Strip. Pay close attention to signal direction, as DMX transmission is unidirectional. More details, pls read What is the Use of DMX512 Controller?
Wiring and Insulation: Use standard DMX cables or high-quality network cables for connections. Ensure proper insulation at all wiring points; for outdoor installations, the use of waterproof junction boxes and silicone sealant is mandatory.
Power-up and Testing: First, switch on the power supply, then turn on the controller; test the light strips segment by segment to verify that they respond as expected.
Why Do Large-Scale Projects Require DMX512 LED Strips?
For large-scale, complex lighting projects, the advantages of DMX512 are unparalleled:
Extended Transmission Range and Interference Immunity
DMX signals are based on the RS-485 standard, enabling stable transmission over distances of several hundred meters. Furthermore, they possess robust immunity to electromagnetic interference, thereby ensuring reliability in outdoor and complex environments.
A Unified Standard
DMX512 is the industry-wide standard, meaning you can integrate DMX devices from various manufacturers—such as moving heads, wall washers, and LED strips—into a single, unified control system.
High-Density Data Streams and Scalability
Although a single Universe comprises only 512 channels, it can be easily scaled—via bridging through Ethernet protocols such as Art-Net or sACN—to encompass hundreds or thousands of Universes, thereby controlling millions of pixels.
Synchronization
All DMX devices respond to control signals with exceptional precision, ensuring perfect consistency in lighting and visual effects across large-scale architectural structures or stages.
Conclusion
DMX512 LED strip light chip not only deliver efficient and stable control performance but also support sophisticated lighting adjustments and synchronization operations. Whether for small-scale commercial applications, large-scale stage performances, or architectural lighting, DMX512 technology is capable of meeting a diverse range of requirements. By selecting the appropriate driver chips and mastering the control methods, you can achieve the most precise and flexible lighting effects possible.
If you have any questions, or would like to learn more about DMX512 LED strips, please feel free to contact us.
FAQs
Yes, the DMX512 chip can control multiple LED strips in series. By setting different channel numbers on the DMX512 controller, independent control of multiple LED strips can be achieved.
Yes, a DMX512 control system typically requires coding to achieve specific lighting effects. For example, when using an Arduino controller, you can programmatically control the color, brightness, and effects of the LED strip. Furthermore, we can use the professional DMX512 control software to write and manage control code.
The transmission distance of a DMX512 signal is typically between 100 and 150 meters, depending on the type of cable used and the chip’s anti-interference capabilities.
We don’t recommended! Although theoretically possible, in practical engineering applications. We need to put the DMX signal lines (data) and power lines (electricity) separately. We recommend using dedicated shielded twisted-pair cables for transmitting DMX signals.
Typically, this is not an issue with the chip, but rather a classic case of “voltage drop.” When current flows through a long LED strip, the resistance of the cable consumes voltage. The longer the strip—and the further it is from the power source—the lower the voltage becomes, resulting in reduced brightness for the LEDs at the end of the strip.